Releasing an application to the Live environment.
This document discusses the process of deploying an application to the Live environment.
1 Introduction
Once the development team are satisified with an application's performance in TEST mode and a sample of end users have approved it in ACCEPTANCE mode, it is time for the application to be deployed to the Live environment where it will be available to all end users.
2 Deploying to the Live environment
The steps below will help you release your application to the Live environment.
2.1 Check the configuration
All redirection links to RunMyProcess in the Web Interface must use the suffix ?P_mode=${P_mode}.
This ensures that the Web Interface is running in the correct mode, TEST > TEST, LIVE > LIVE. More information about P_mode.
N.B: Don't pass the P_version=${P_version} parameter. As versions are related to projects, if you redirect to a Web Interface that does not belong to the same project you will get an error.
2.2 Releasing the first version
Before releasing your project to LIVE, you will need to create a version. Projects may include other projects therefore it is important to consider the hierarchy and start from the bottom.
For example, consider a project with the configuration:
- P3
- P1 (included in P3)
- P2
- P1 (included in P2)
- P1
- Project 'Mail provider' (included in P1)
- Project 'Connectors' (included in P1)
In this project, the order to respect is: Project 'Mail provider', then Project 'Connectors', then P1, followed by P2 and then P3.
To create a new version, go to the Project View, choose the Versions tab and click on New Version.

Enter a name for your version. It is good practice to enter the date and the version number as your title for the first version.
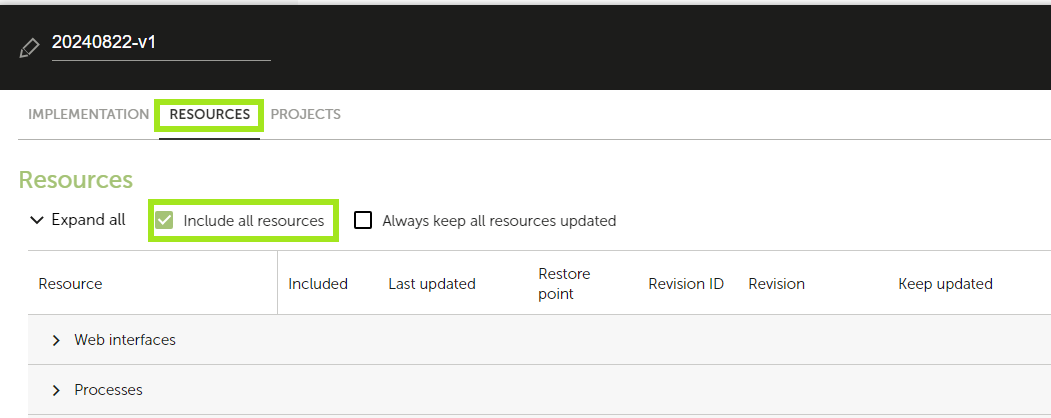
You will see two options - Include All Resources and Always keep all resources updated:

- Include all resources
- You should always tick this option - you can't run a resource in LIVE that is not part of the LIVE version.
- Always keep all resources updated
- If your project contains ONLY providers / connectors then tick this option;
- For all other projects, this option should NEVER be ticked.
N.B. If this option is ticked, any modification you make to your application will directly impact the LIVE environment. This is a powerful feature but very dangerous. This option should only be used for Providers and Connectors that are unlikely to be modified, or will only be changed for something small such as updating an obsolete password.
Then you can save your version and return to the versions list:

You can now switch it to LIVE by clicking on the Pencil icon next to the Mode and choosing 'Production'. You will be asked to confirm that you want to release this version to Live.
This should be repeated for all your projects, in the correct order. You'll then be able to open your Web Interfaces in LIVE, using the suffix ?P_mode=LIVE in the URL.
2.2 Releasing subsequent versions to the LIVE environment.
When releasing a version other than the first one, it is important to assess whether the changes made since the last version are Minor or Major. This is because it will determine what should happen to existing instances - should they continue to run in the previous design or should they run in the new design?
2.2.1 Minor/Major changes
The following will help you to decide if the changes made should be considered as Minor or Major.
| Web Interfaces | |
|---|---|
| Minor Changes | Major Changes |
| * Label Renaming | * Adding a Variable |
| * Changing a CSS | * Changing a Variable Name |
| * Changing a widget's position | * Changing a script - adding / listening to a new variable |
| * Adding a new screen in order to add a new validation step in the process. |
| Processes | ||
|---|---|---|
| Minor Changes | Major Changes | Warnings |
| * Activity label renaming | * Deleting / * Adding a new activity | Measures are not versioned |
| * Row or gateway label renaming | * Changing activity type | * NEVER delete a measure as you will disorder your reports (columns & filter) |
| * Adding a comment | * Adding / Deleting branches on a gateway | |
| * Changing a freemarker script without using new variables | ||
* Adding a new measure (tip: always manage default values using ?default("mydefautvalue")) |
||
| * Changing a measure formula not used as a filter |
| Connectors / Providers |
|---|
| WARNING |
| The best practice is to have a separate project for providers and connectors, with a version ticked as "Always keep all resources updated". You should NEVER modify a connector as this will have an immediate effect on your LIVE application. If you need to make a change to a connector, it is best to create a new one. The only situation in which it's acceptable to change a Provider is when you need to update an obsolete password. |
| Custom Lists | |
|---|---|
| Minor Changes | Warnings |
| *Adding a label /value | * Do not change a value or delete an item as you will loose information in your existing processes. |
| * Changing a label |
| Collections | ||
|---|---|---|
| Minor Changes | Major Changes | Warnings |
* Storing items with new keys e.g. you had contacts {"firstname":xxx,"lastname":xxx,"address":xxx} and now you pass a new field "phone":xxx |
* Changing/Deleting a key, we highly recommend you avoid this. It can be compared to changing a column name in a database. As you use keys in patterns and to parse results, this may lead to many errors in your script (both JavaScript and Freemarker). | * The best practice is to always have homogeneous objects. If you intend to add a new field in new items, the best practice is to update existing objects passing a default value for this field (e.g. if adding a field for phone number, set "phone":"" for existing items). |
| * You should NEVER change the name of a collection, as it's also its unique identifier. If you change it you break the link with other resources and freemarker functions won't work anymore. | ||
| * Before deleting a collection, make sure that it's not used anywhere. When it's deleted, it is unrecoverable. |
| Reports (Web Interface & Process) | ||
|---|---|---|
| Minor Changes | Major Changes | Warnings |
| * Changing / Deleting a filter on a measure, screen or status | * Delete a column (as the JavaScript filter methods use measure ids, if you remove a column, you can't filter on this measure using JavaScript anymore) | * If you add a column relying on a newly created measure, you should ensure you put a default value to handle existing instances (?default("mydefaultvalue")) |
| Projects | |
|---|---|
| Minor Changes | Warnings |
| * Title renaming | * NEVER detach a resource that is used in Production from a project. If this happens, you should reattach it to your project as soon as possible. |
2.2.2 Creating a subsequent version
To create a new version, go to the Project View, choose the Versions tab and click on New Version

Enter a name for your version. It is good practice is to include the date, the version number and possibly list 2 or 3 major features added since the last version. Then go to the Resources tab:

You will see two options - Include All Resources and Always keep all resources updated:
- Include all resources
- You should always tick this option. You can't run in LIVE a resource that is not part of the LIVE version.
- Always keep all resources updated
- If your project contains ONLY providers / connectors then tick this option;
- All other projects should NEVER tick this option as it means that any changes would immediately impact the LIVE environment.
After the project has been saved it can be switched to LIVE by going to the Versions list, identify the newly created version, click on the pencil icon next to the Mode and choose Production.

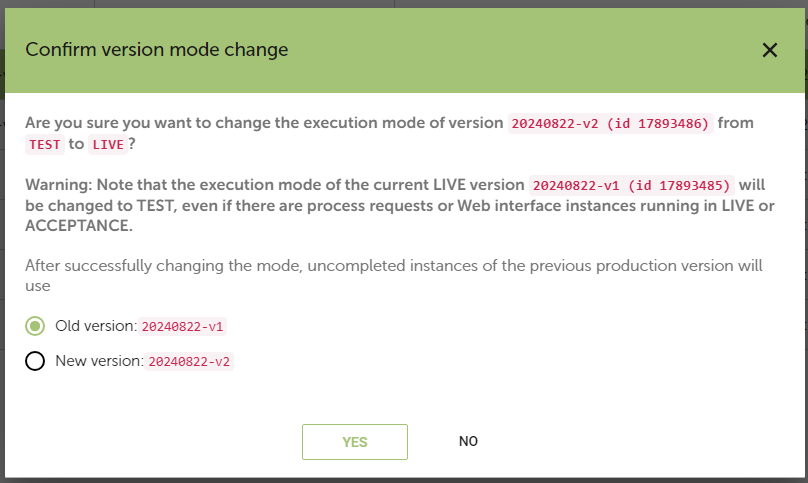
When you try to deploy a subseqent version to LIVE, this popup message will appear:

The answer to this important question will depend on whether it was determined that the changes made since the previous version were Minor or Major.
- If only MINOR changes were made, the ** 'New version'** option can be ticked and uncompleted processes will run in the new version. It is also possible to allow uncompleted process to continue to use the 'Old version' if this is more appropriate for the situation.
- If any MAJOR changes were made, it is essential that you let uncompleted processes run in the old version. You should therefore tick 'Old version'.
Important note : If you made MAJOR changes and tick 'New version', you may jeapordize your pending processes forever as :
- the execution path becomes incoherent from the moment you change the process design;
- if you listen in your script to variables that weren't defined in uncompleted processes, you'll get errors.
3 The version architecture
When you create versions sequentially (by choosing to allow uncompleted processes to run in the 'New version' of the project), you create a chain.
If you create v1 then v2 then v3 with that option, you'll have:
- processes triggered in v1 now running in V3
- processes triggered in v2 now running in V3
- processes triggered in v3 still running in V3
If you subsequentally create a V4 but specify that uncompleted versions should run in the previous version of the project, the chain is broken.
It means that if you then create a v5 ticking 'New version' you have:
- V1, V2, V3 will keep running in V3
- V4 in V5
4 Rebooting a red process in production
First read the tutorial: How to reboot red processes
There are several reasons why processes in LIVE may fail, the four main ones are:
- (1) A connector retrieved a time out error message
- (2) A connector retrieved an error message because a parameter was passed in an incorrect format
- (3) A script crashed because a variable doesn't exists
- (4) You made an infinite loop, either in the process design or within a script
The procedure for dealing with these cases are detailed below:
Case (1) A connector retrieved a time out error message
In this case you should reboot the process in its current version.
Cases (2), (3) & (4)
In these cases there is a problem with the process design. It may be that a case wasn't handled, a break is missing in a while loop or a call has been made to a variable that doesn't exist. The error message reported should provide enough details to investigate the cause of the error and the appropriate steps to take.
Once you have identified the source of the problem you should:
- Edit the process, correct the script and SAVE it;
- Create a new version (see above);
- Deploy the new version to LIVE;
- Re-open the red process instance and reboot it in the newly created version from the list of versions available.