Training Modules
MODULE 1 : DESIGN A RUNMYPROCESS APPLICATION
Platform overview
BUILD
- Projects: edit or create a new RunMyProcess application. A project contains different resources and can be versioned.
- Resources: All the available resources regardless of the project (web interfaces, processes, reports, collections, composite APIs, custom lists, connectors)
MANAGE
- Acccount: manage all the customer account settings. Administrators can manage the account and configure it according to their requirements.
- Roles: manage your organizations, entities, and roles. The rights (open, design, monitor) are based on the entities and roles.
- My Settings: allows the user who is logged in to DigitalSuite Studio to view and change all settings related to his/her account.
- Users: Customers can register users to their account as needed. They can add and modify users individually or use bulk and mass operations to do so.
MONITOR
- Usage: monitor the usage of the account. It enables users with an Administrator profile to view detailed data on the subscription and the consumption of platform resources.
- Messages: monitor the processing of emails for triggering processes and composite APIs.
- Schedules: monitor the execution of schedules defined for processes and composite APIs.
IMPORT
- Connectors: access the pre-built connectors from different providers that offer services to be integrated into your applications (e.g. Salesforce, Google, or Office 365).
Design an application
Design a Vacation request application.
This document outlines the process of designing a vacation request application. It will delve into the key considerations, functionalities, and design principles required to create a user-friendly and efficient system for employees to request and managers to approve time off.
The primary goal of this document is to provide a comprehensive understanding of the design process for a vacation request application. It will be a foundation for subsequent development phases, including requirements gathering, system architecture, user interface design, and implementation.
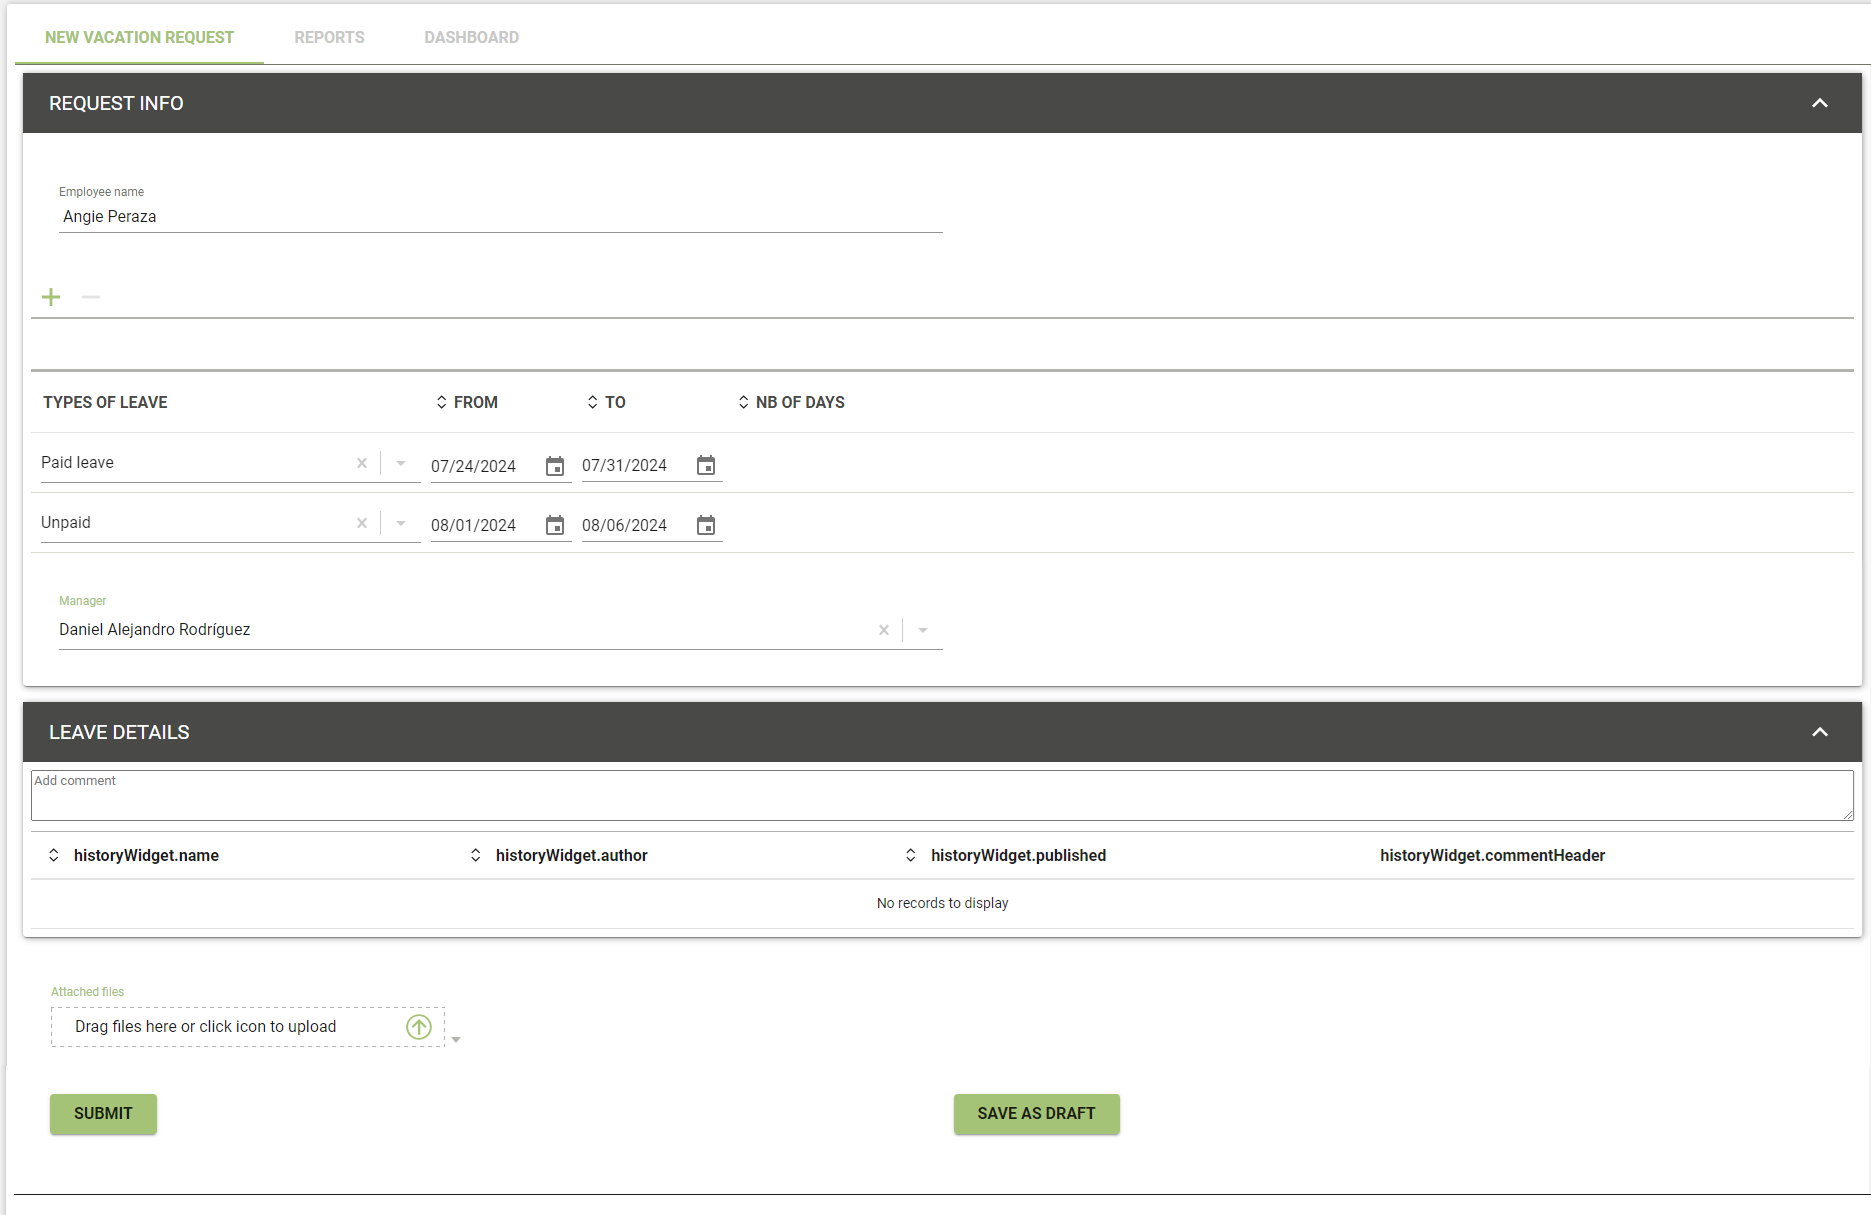
- The main web interface: Vacation request form
This web interface is designed for employees to submit vacation requests. The clean and intuitive layout guides users through the request process, making it easy to input the necessary information and track the status of their requests.
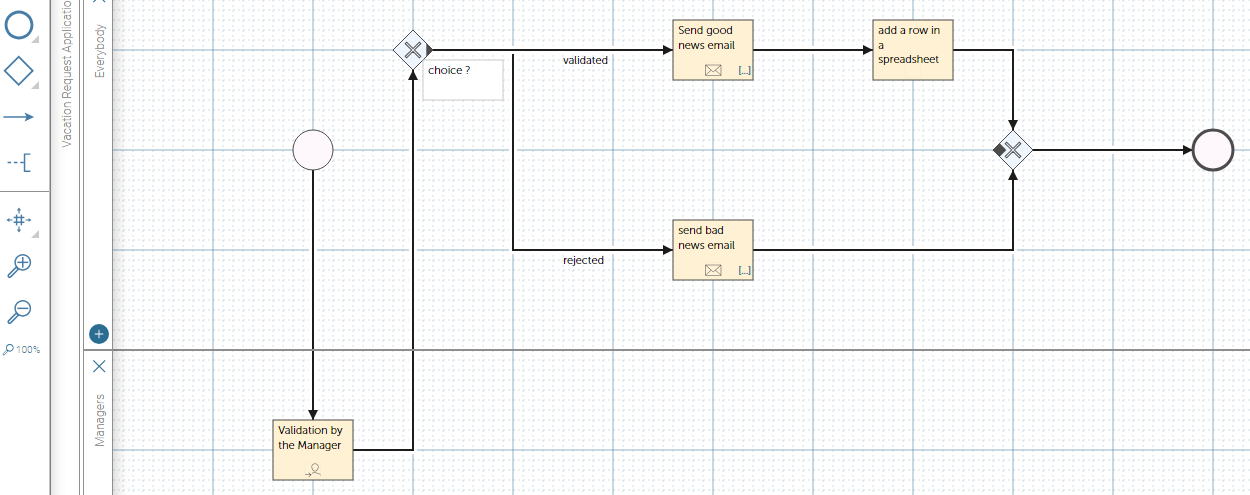
- The workflow :
This image outlines a workflow for a vacation request approval process. The core functionality involves:
- Request Submission: An employee submits a vacation request.
- Manager Approval: The request is routed to the employee's manager for approval.
- Decision and Notification: The manager either approves or rejects the request. The employee is notified of the decision via email.
- Google Spreadsheet Integration: Regardless of the decision, a new row is added to a Google spreadsheet.
Process
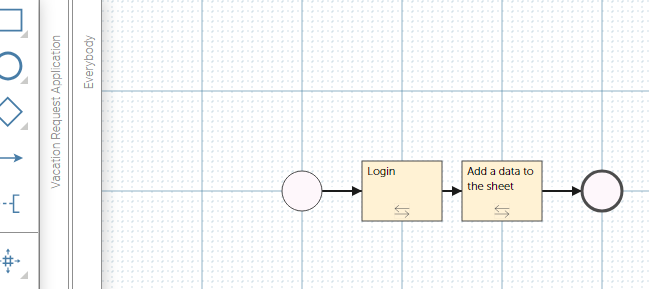
Sub-Process
- Reports:
The reports are designed to provide visibility into both employee and manager-specific data related to vacation requests.
Report: Employees
- My Requests: Displays a list of all the employee's submitted vacation requests, including the request name, creation date, and total number of days requested.
- My Drafts: Presents a list of the employee's saved vacation request drafts, allowing them to review and complete requests at a later time.
Report: Manager
- My Tasks: Displays a list of vacation requests that require the manager's approval, including the request name, creation date, and total number of days requested.
- All Requests: Provides a comprehensive view of all submitted vacation requests within the manager's team, enabling them to track overall vacation usage and planning.

- Dashboard:
These charts offer a quick and easy way to understand the distribution of vacation requests among different companies.

Standard Steps
-
Define the organization and roles: For every new application you create, there will be a dedicated set of roles (managers, approvers, super managers, etc.). A good practice is to create a dedicated organization per application. Access the quick guide for detailed steps.
-
Create a project: For every RunMyProcess application, you will need to create one or several projects since you'll need to have different set of rights for your resources and you won't version them the same way. Access the quick guide for detailed steps.
-
Design a process: You will usually have a main process and several subprocesses. Access the quick guide for detailed steps.
-
Create a web interface: In your main project, where you have configured the main process, you will configure the main web interface that triggers this process. Access the quick guide for detailed steps.
-
Create a custom list 'Type of Leave': To populate a drop-down menu with the different options in your web interface. Access the quick guide for detailed steps.
-
Create a manual task: This will allow the manager to review the request. Access the quick guide for detailed steps.
-
Create email notification: This will allow the application to notify the manager decision to the requester. Access this document for further details.
-
Create a subprocess 'add a row in the google spreadsheet': This will allow to have a predefined set of task for a complete integration with the Google Spreadsheet service. Access this document for further details on creating subprocesses.
Plug connectors
This section outlines how to connect your subprocess to Google Sheets using two connectors:
- Google Oauth2 authentication: Refresh access token
- Google Sheets v4: Append row(s) of values to table [v4]
Access the quick guide for detailed steps.
1. Obtaining Google API Credentials
- Create a Google Cloud Project:
- Visit the Google Developers Console and create a new project.
- Enable the Google Sheets API:
- In the left navigation menu, go to APIs & Services > Library.
- Search for "Sheets API" and enable it.
- Create OAuth Client ID:
- Go to APIs & Services > Credentials.
- Click "Create credentials" and select "OAuth client ID".
- Choose "Web application" as the application type.
- Download the JSON key file containing the client_id and client_secret.
2. Obtaining a Refresh Token
- Visit the Google OAuth Playground: Go to https://developers.google.com/oauthplayground/.
- Update Settings: Click on the gear icon and add your own OAuth credentials.
- To use this playground, you will need to update your credentials settings and add two redirect URIs:
- https://developers.google.com/oauthplayground
- Your RMP application's main web interface URL (e.g., https://live.aw1.us.runmyprocess.com/wire/118401629711015586/wi/1988016566/state/0?P_mode=TEST)
- Authorize API:
- Select "Google Sheets API v4" and "https://www.googleapis.com/auth/drive". Click "Authorize APIs". Grant access when prompted.
- Exchange Code for Token: Click "Exchange authorization code for tokens". This will provide the refresh_token.
- Optional Test: You can perform a test API call here.
3. Configuring the "Login" Task
- Define Task Type: In your subprocess configuration, select the first task. Set its type to "Connector".
- Select Connector: Choose the "Google Oauth2 authentication: Refresh access token" connector.
- Provide Input Variables:
- client_id: Use the value from the downloaded JSON key file.
- client_secret: Use the value from the downloaded JSON key file.
- refresh_token: Use the value from the previous step.
4. Enable Result Injection
Ensure the "Inject results" option is selected for the "Login" task. This automatically stores the generated access token for subsequent use.
5. Configuring the "Append to Spreadsheet" Task
- Define Task Type: Select the second task and set its type to "Connector".
- Select Connector: Choose the "Google Sheets v4: Append row(s) of values to table [v4]" connector.
- Provide Input Variables:
- spreadsheet_id: Extract the ID from the Google Sheet's URL (e.g., https://docs.google.com/spreadsheets/d/
/). - range: Refer to the documentation (https://developers.google.com/sheets/api/guides/concepts#a1_notation) for specifying the target range in A1 notation.
- values_array: Define the data structure containing the values to be appended to the sheet. You can find examples in the connector documentation.
- spreadsheet_id: Extract the ID from the Google Sheet's URL (e.g., https://docs.google.com/spreadsheets/d/
Note: Replace
with the actual ID of your Google Sheet.
Testing application
To ensure optimal application performance and reliability, it's crucial to conduct end-to-end testing to verify that all system components function correctly together.
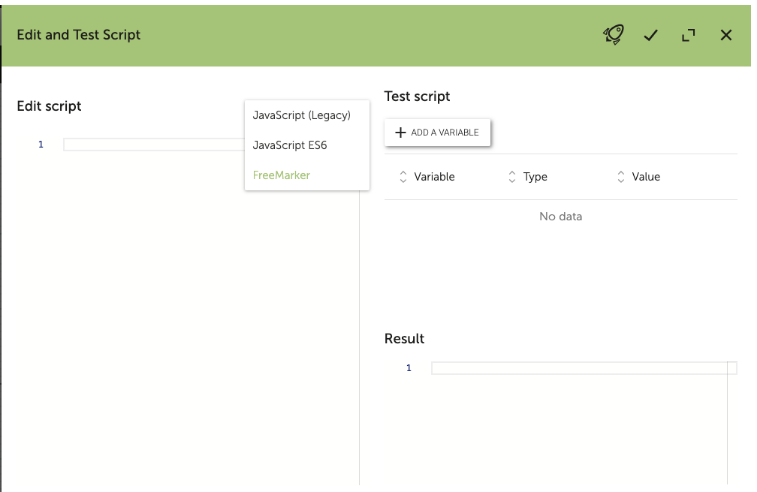
For granular code testing, the process testing console offers a dedicated environment to isolate and examine specific code segments.
Create end-user reports
1. Create measures in processes
To incorporate process data into reports, create measures within your process:
- Navigate to the process settings and access the Measures tab.
- Define new measures by specifying a name and the corresponding process variable.
- Select the appropriate measure type and add any required details.
- Close the dialog and save the process.
2. Create reports
Web interface reports provide valuable insights to users about their tasks and requests.
- Access the Reports section within your project resources and select Web Interface Reports
- Click on the Add icon to start building a new report
- Select the automatic mode
- Select the main web interface
- Customize the report by choosing relevant screens, filters, and columns. Utilize both default columns and previously defined measures.
- Save the report with a descriptive name.
The included video demonstrates a sample "My Tasks" report.
Note: Access the specific guide for further details.
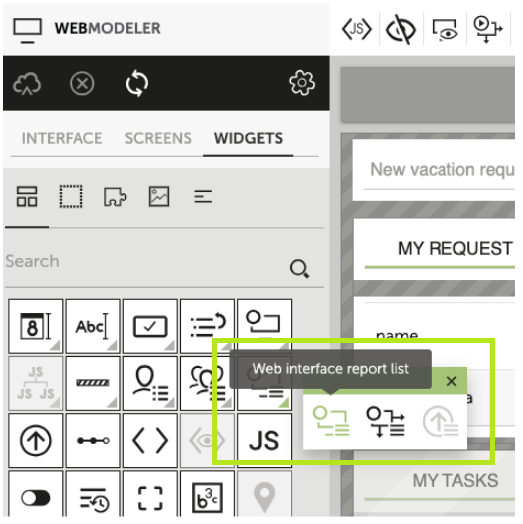
3. Embed reports in web interfaces
Enhance user experience by seamlessly integrating reports into web interfaces using the Web Interface Report List widget.
Create a dashboard
Gain valuable insights into your process data by building custom dashboards. Access the detailed guide here.
Add menu bar, redirection links, progress bar
-
To improve navigation and user experience, standardize the header and menu bar across all web interfaces.
-
Configure redirection links:
To streamline the user experience, implement the following redirects:
- Upon successful vacation request submission: Automatically direct the employee to their "My Requests" report page.
- After manager approval or rejection: Redirect the manager to their "My Tasks" report page.
These redirects eliminate unnecessary steps and provide immediate feedback to users.
-
To enhance transparency and user engagement, display a progress bar on the main vacation request submission page. This visual element should:
- Clearly indicate the current step in the vacation request process.
- Show completed steps and remaining steps.
- Provide a sense of progress and expectation management.
Create a home page 'All Applications'
Organize and showcase your applications by creating a dedicated 'All Applications' home page. This central location will list all available applications for easy access and navigation.
Create a new version in production
- What is the P_mode parameter in the web interface urls
- Tutorial: Create the first v1 in live + how to release then a v2
What are the new features after each release?
- See the releases notes
MODULE 2 : ADVANCED DESIGN
How to reboot red processes
- Need to troubleshoot an issue before deployment or fix a live application? Refer to the "How to resume processes" tutorial for detailed guidance on restarting red processes.
Create a RunMyProcess custom login page
Advanced Javascript
-
The must-read before using javascript
- FAQ
- List of the RunMyProcess javascript methods
-
Basic data manipulation
- Use JS dynamic rules on widgets
- Access RunMyProcess resources using jQuery : Tutorial on how to perform a request to RMP resources using jQuery
Advanced Freemarker
- The must-read before using freemarker
- List of the RunMyProcess freemarker methods
- Basic data manipulation
- Keep in mind
- Freemarker can only be used in the processes : it’s a server language
- it may be used some time in the web interface to display only a computed parameter (ex : ${P_connected_user.name}, ${any_variable_in_the_process}
- To color your Freemarker code, to copy-paste it, use notepad++. Select language 'XML'.
How to use process listeners
- Tutorial : what is a process listener, and how to configure it.
- ex : get the Exchange Rate from European Central Bank (ECB)
- configure a process with currency as input parameter, and that retrieve the exchange rate using ECB connector
- configure a custom list of currencies USD, EUR, JPY
- configure a web interface
- include the custom list and a text input 'FX rate"
- configure a process listener that will listen to the currency variable and retrieves the fx rate into the web interface
- include a spinner to be displayed when process is running
- [PRACTISE] Ex : design a application 'Price approval process'.
- The initiator enter a price in EUR, a process listener get the fx rate and displays the amount in USD
- The initiator submits this price for approval to the manager.
- The manager can approve or reject. If rejected, the process loops back to a task for the initiator, then ask again manager approval.
- Design the login page that redirects to this application after user logs-in
- Note: Process listener can be launched when screen is loaded, the list of fx_rate can be saved as a map in the js context, and a js scripter can listen to the map and selected currency => it's more efficient as there are less calls
- [PRACTISE] Exercice: Get the list of rows from a Google Spreadsheet and display them into a RMP variable based list (ex : product title, product description, product price)
- Create a spreadsheet with columns firstname, lastname, email, address
- Read How to deal with the result of a webservice regardless of its structure
- What is a variable based list, what structure should be passed to the list?
- Build a Dynamic List
- Plug the process listener to the web interface and display the content of the spreadsheet
Create a new connector
- Configure a new REST or SOAP connector on your RunMyProcess account
- ex : How we prepackaged 'Add a new event in Google Calendar' connector. See Google calendar API developer's guide
How to use RunMyProcess Collections
- [PRACTISE] Tutorial : How to use collections
- [PRACTISE] Tutorial : How to create a backoffice to manage collections
- [PRACTISE] Tutorial : How to create linked lists
- [PRACTISE] Tutorial : How to create linked lists in an array
Before switching your project to LIVE
- Build an application to be notified when processes fail
Note for RunMyProcess Integrators
- Ask a customer to grant you access to his account
- RunMyProcess support has an internal tool to copy an application from an account to another one.
- RunMyProcess support can provide you with useful tools for your projects deployments, eg: a back office to Create/Update/Mass import users, reset passwords.
- If you need technical help to build prototype, and before designing your first projects, contact our support.