Budget approval request application
To help you get started with the RunMyProcess platform we are creating some application templates for you to use. These applications are pre-installed on your account, and/or can be downloaded into your account. The applications are fully functioning and you can use them for your company's applications. You also have the possibility to customize the applications for your specific needs. ie. add your own budget categories or departments, define specific approval workflows etc. In this example, we will look into one of the applications - the budget approval request management application. The guide below describes how to use the Budget approval request application that is available from your RunMyProcess account.
By default, this application is set to test mode. When in test mode, all the notification emails of an application are sent to the user who submitted the request, and all manual tasks are assigned to the requestor. To redirect emails and assign manual tasks to a correct user, you have to put the application in production. For more information, please refer to How to put the application in production.
Description of the application
The web interface ‘Budget approval request'
Open the Budget Approval Web Interface:
- Navigate to the project list
- Find the "Example - Budget Approval" project: Search for or scroll through the list to find the project named "Example - Budget Approval".
- Open the Web Interfaces tab: Click on the "Web Interfaces" tab associated with the project.
- Select and run the web interface: Within the "Web Interfaces" tab, locate and click on "Example - Budget Approval". This will initiate the web interface.
- Budget approval request opens: The budget approval request will display in a new browser tab.
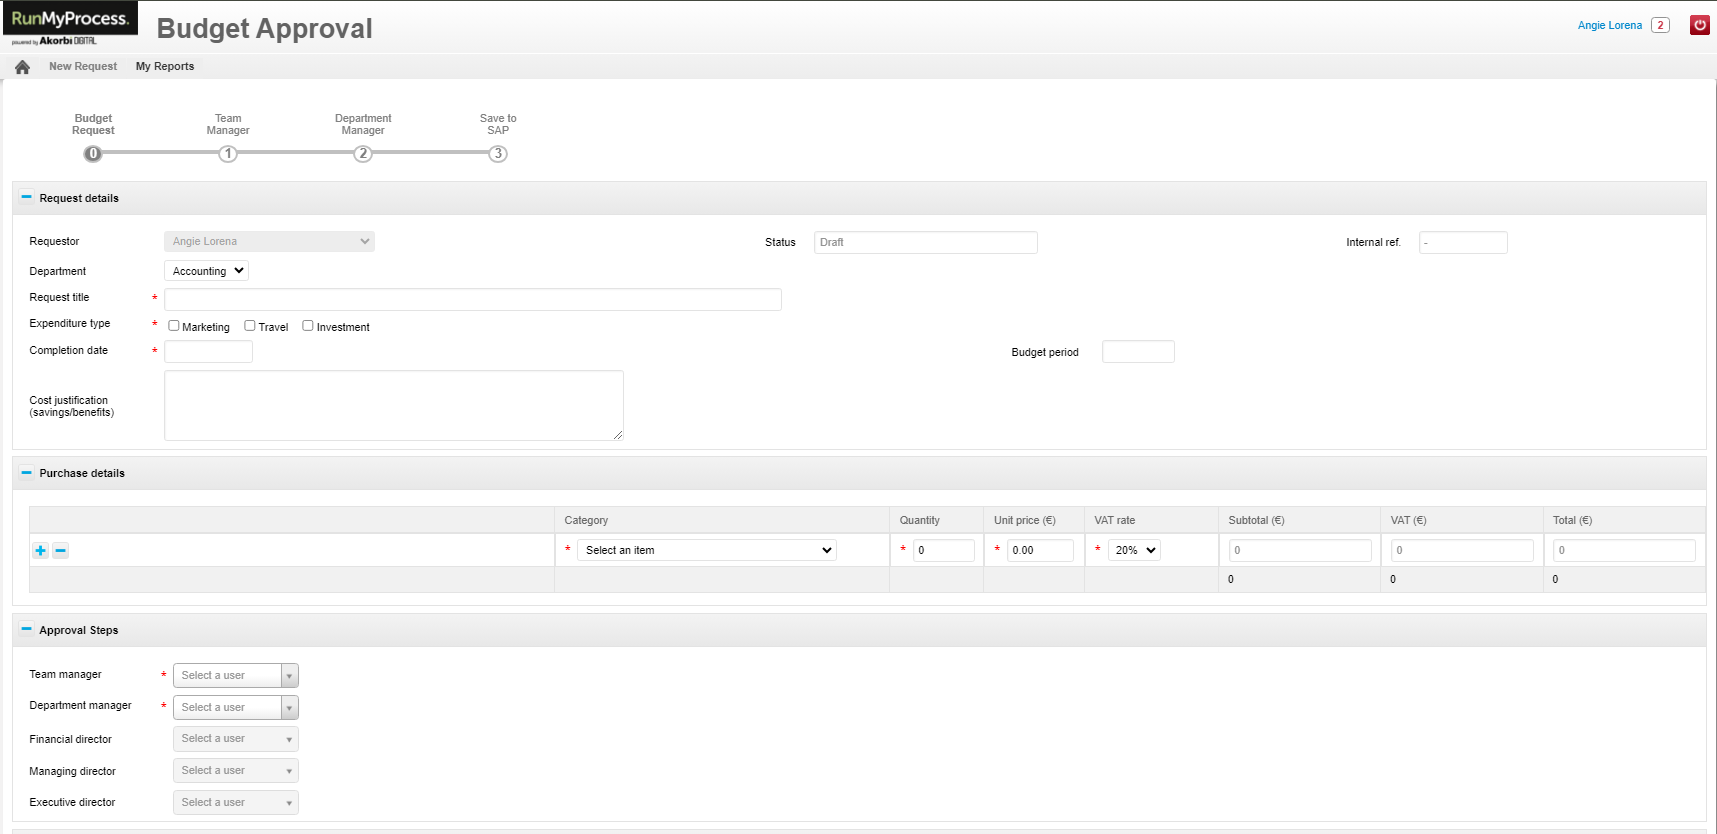
Here is the description of the different elements of this web interface:
- Requestor: the user who initiated the request. This field is not modifiable.
- Status: the status of the request. The status can take the following values: “Draft”, “Waiting for department manager approval”, “Waiting for financial director approval”, “Waiting for managing director approval”, “Waiting for executive director approval”. “Rejected” or “Approved”.
- Internal Ref.: internal reference of your request. This reference is created automatically when a new request is submitted.
- Department: the department concerned by the budget approval request.
- Request title: the title of the budget approval request
- Expenditure type: the type of expenditure
- Completion date: the planned date of the purchase.
- Cost justification: description of the savings and benefits of the purchase. This field is optional.
- Details of the purchase: the array of all the purchases associated with the request
- Description: the description of the purchase.
- Category: the category of the purchase.
- Quantity: the required quantity.
- Unit price (€): the unit price of the purchase.
- VAT rate: the VAT rate that applies to the purchase.
- Subtotal (€): the total amount excluding taxes.
- VAT (€): the VAT amount
- Total (€): the total amount including taxes.
- Approval steps: the list of approval steps as well as the name of the users assigned to each step. The number of mandatory approval steps depends on the total sum requested. If the total amount is under 5,000€, there are 2 mandatory validation steps and the 3 other steps are optional. If the total amount is between 5,001€ and 10,000€, there are 3 mandatory validation steps. If the amount is above 10,000€, there are 5 mandatory validation steps.
- Comments: the comments added by different actors of the process. Enter a comment in the text box and then click Add comment to submit your comment.
- Save button: this button allows you to save your request as a draft, without submitting it. All drafts are available in the web interface Budget Approval Management - Report, under the tab My requests by status.
- Save and submit for approval button: this button launches the budget approval request. You can submit a request only when all the required fields are filled in.
The Budget Approval Management process.
To open this process, select tab Processes in the top of the page. Select Budget Approval Management of the list to view the process.

This is the design of the process:
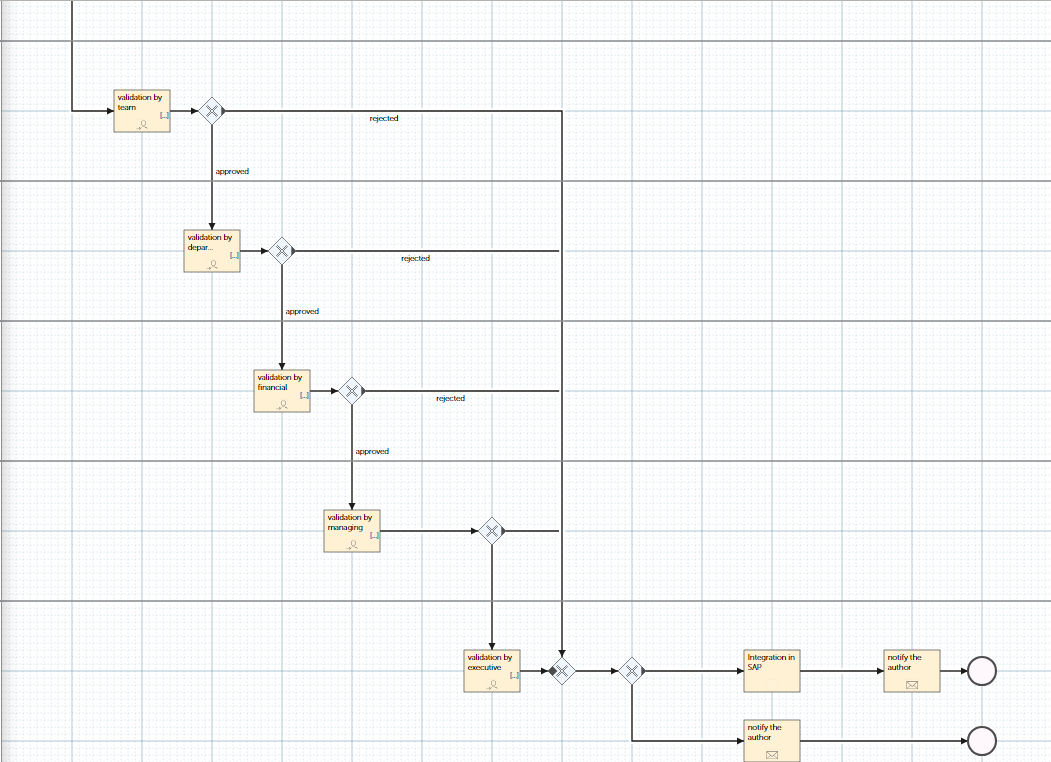
Once a new request is submitted, the team manager receives a notification email with a link towards to the manual task that was assigned to him/her. Once the team manager opens the manual task, he/she can then approve or reject the request by clicking on the corresponding button.
Note: to reject a request, the team manager needs to select a refusal reason.
If the request is rejected, an email is sent to the requestor notifying him/her of the rejection which terminates the process. If the demand is validated, another manual task is created and is assigned to the financial director, who then has to validate or reject the request. Once all the manual tasks have been validated, the requestor is notified of the validation of his/her request.
The web interface Budget approval requests - Report
Run the Budget Approval Report Web Interface:
- Open the "Web Interfaces" tab: Click on the "Web Interfaces" tab.
- Select "Budget Approval - Report": Locate and click on "Budget Approval - Report" within the list of web interfaces.
- Run the web interface: Click the "Run web interface" button (or similar wording) to initiate the report.
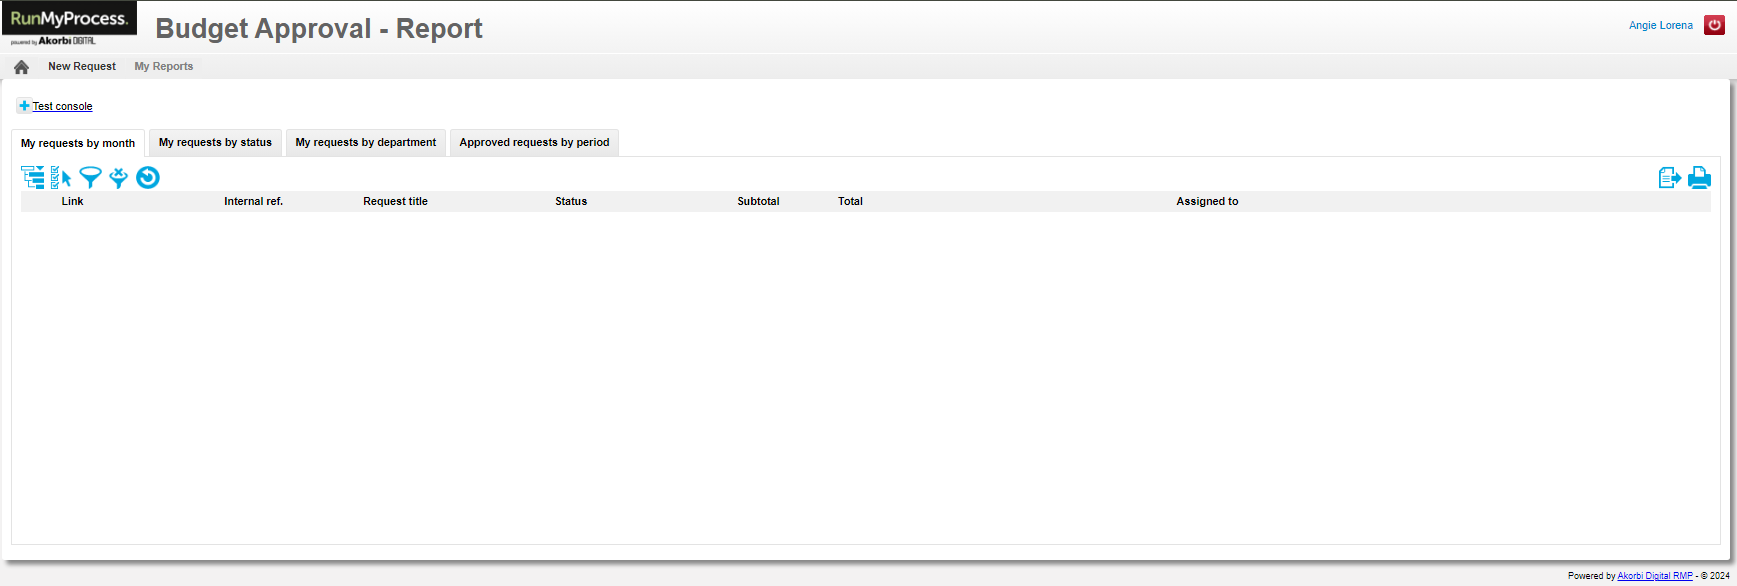
This application has 4 tabs.
- My requests by month contains all requests started by the connected user, aggregated by month.
- My requests by status is the aggregated view of the requests started by the user filtered by status
- My requests by department is the aggregated view of the requests started by the user filtered by department
- Approved requests by period contains the list of approved requests, aggregated by year.
How to test the application
Launch a new process instance
To try the application select Example - Budget Approval in RunMyProcess - Homepage.
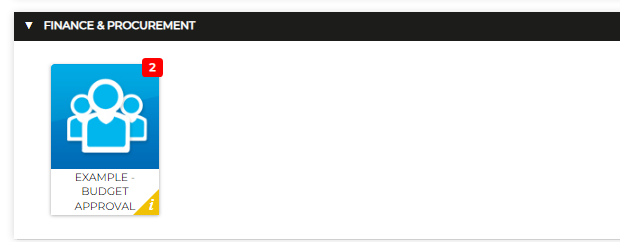
Fill in the web interface and click Save and submit for approval. If you want to save the web interface as a draft and submit it later, click on Save. You can access your drafts in the web interface Budget approval requests - Report, under the tab My requests by status.
Validate manual tasks
A notification email is sent for every step of the process. When the process is in test mode, notifications are sent to the user who submitted the request : he/she will receive every email sent by the process and be assigned every manual task.
Monitor the execution of the process
To monitor the execution of the process, go to Reports, select Process reports, select Test and Run report.
In this report, a user can access all the process instances launched in test mode. In a process instance, the pending stage of the process is indicated by an orange dot. To access to variable of the process instance, click under the tab Parameters.
How to put the application in production
In this part, you will learn how to put the application in production. Once the application is in production, the manual tasks are assigned to a correct user and the emails are sent to the correct email address.
Adding new users to the application
This section outlines how to add users to your organization and assign them the "Example - Budget Approval" role for testing purposes.
- Access Roles Management: Navigate to the section for managing roles within the application.
- Find "Example - Budget Approval" Organization: Identify and click on the organization named "Example - Budget Approval". Then select the role you want to add users to.
- Add Users: Utilize the search function to find the users you want to assign the role to.
- Drag and Drop: Drag and drop the desired users from the search results onto the selected role.
- Save Changes: Once you've added the desired users, click the "Save" button to confirm the role assignment.
Modification of the reports
Different reports of the application (web interface reports, process reports) are set up to filter the requests in test mode. You need to modify them so that they display the requests in live mode.
Select Example - Budget Approval in Projects and open the four web interface reports. Then, select Live and save the reports. Repeat the process with the processes reports.
Creation of a new version
This section guides you through the process of creating a new production version and deploying the "Example - Budget Approval" application.
-
Create a New Production Version:
- Navigate to the "Projects" section and locate the "Example - Budget Approval" project.
- Open the "Versions" tab associated with the project.
- Click the "Add" button to initiate version creation.
-
Name the Version and Configure Subprojects:
- Enter "V2" (or your preferred version name) for the new version.
- Switch to the "Projects" tab within the version editing interface.
- Locate the sub-project named "Mail Provider".
- By default, the latest version created for that subproject is selected.
- If you want to select a different version, click on the “Edit” icon.
- Save the newly created version.
-
Promote the Version to Production:
- Return to the version’s list.
- Locate the newly created version, under the column “Mode” select the option “Live”.
-
Confirmation:
- A confirmation message will be shown. If you have a previous version in Live, you will need to select which version you want to use for ongoing requests.
How to customize the application for my needs?
Now that you’ve created a new version of the application there are many things you can do to customize the application for your specific company’s needs. You can customize things such as the list of internal departments, types of expenditures, product categories etc.
Note: it is necessary to create the new version from the initial sample version pre-installed on your account, as described in the steps above, before making these customizations.
How to modify the list of departments?
Select Custom Lists and open the list Budget Approval Management - Departments list. You can then add or delete lines. Do not forget to save your changes.
Follow the same steps to update the other lists.
How to modify the syntax of the budget approval requests reference number?
- Go to the Processes tab: Locate the Processes tab at the top of the page and click on it.
- Select Budget Approval Management: Within the list of processes, find and click on Budget Approval Management. This will open the process for viewing.
- Select the start event of your process and edit it. Then modify the value of the variable internal_ref.
Note: the value returned by next_value() is different if you launch your process in test mode or in live mode.
EC${next_value("internal_ref")?number?string("0000")} returns EC0001
- To modify the prefix of the internal ref, replace or delete the string EC. PREFIX${next_value("internal_ref")?number?string("0000")} returns PREFIX0001
- To have a number on 3 characters rather than 4, replace 0000 by 000. EC${next_value("internal_ref")?number?string("000")} returns EC001
- To start form another index that 100, use the following script: EC${(next_value("internal_ref")?number+100)?string("0000")} returns EC0101
- To add a sufix to the internal ref, add a string at the end: EC${next_value("internal_ref")?number?string("0000")}SUFIX returns EC0001SUFIX
- To add the date to the internal ref, use this script (example: 2012-01- EC${now("yyyy-MM")+”-”+next_value("internal_ref")?number?string("0000")} returns EC2010-01-0001
- To add the year in the internal ref and reinitialize the number at 0 every year, use this script: EC${now("yyyy")+”-”+next_value("internal_ref")?number?string("0000")} returns EC2012-0001
- To reinitialize the internal ref. to 0, change the string used by “next_value” EC${next_value("internal_ref_2")?number?string("0000")}
How to change the currency in the purchases array?
- Open the Web Interfaces tab: Click on the Web Interfaces tab associated with the project.
- Select and run the web interface: Within the Web Interfaces tab, locate and click on Example - Budget Approval. This will initiate the web interface.
- Select the purchase array: In the label of the columns modify the € character. Do the same thing in the second array below.
- Do not forget to save your changes.
How to modify the list of users available for each approval step?
Select Organization and select one of the role, Department managers for instance.
Search user, drag and drop the desired users from the search results onto the selected role.
How to change the name of the approval steps?
To do that, you have to modify both the web interface and the process.
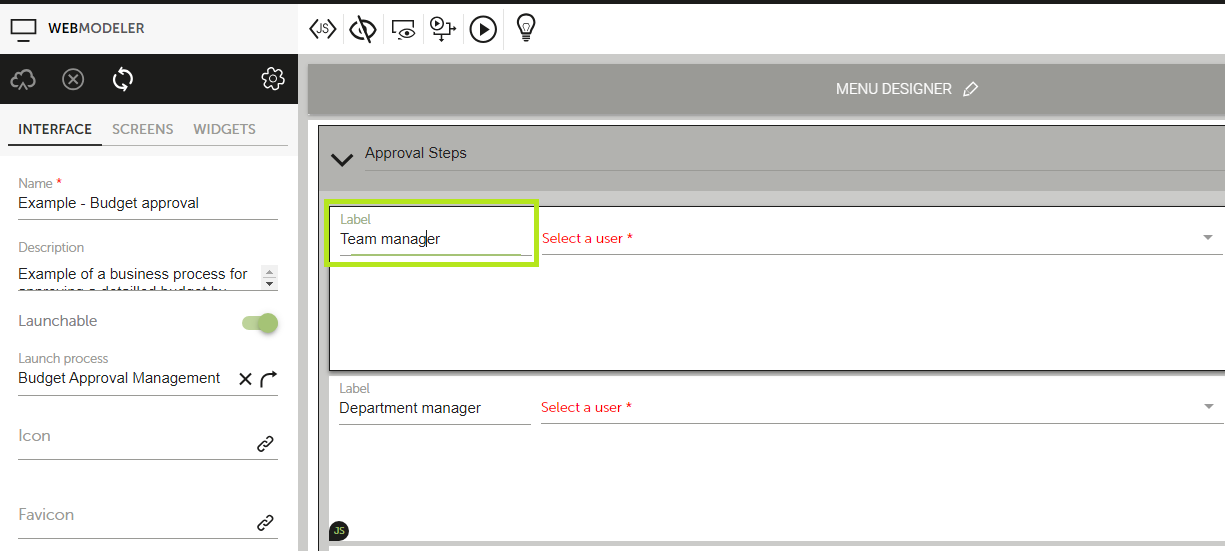
First, go to Web interfaces and open the form Example - Budget Approval. Select the different approval steps and modify their labels and save your changes.
Select Processes and open the process Budget Approval Management.
Now, select the different manual tasks of the process, click on the edit button and go to the Input parameters tab. Under this tab, modify the value of the variable my_status accordingly. Do this for all the five manual tasks and save your changes.

How to modify the investment amounts that trigger additional mandatory approval levels?
To do that, you need to modify the web interface. Go to Web interfaces and open the form Example - Budget Approval. Select the widget Department manager. In the properties of the widget, go under the tab Required rule.
In the script, modify the amount - 5,000 in this case - for which the process has to switch from 2 mandatory approval step to three.
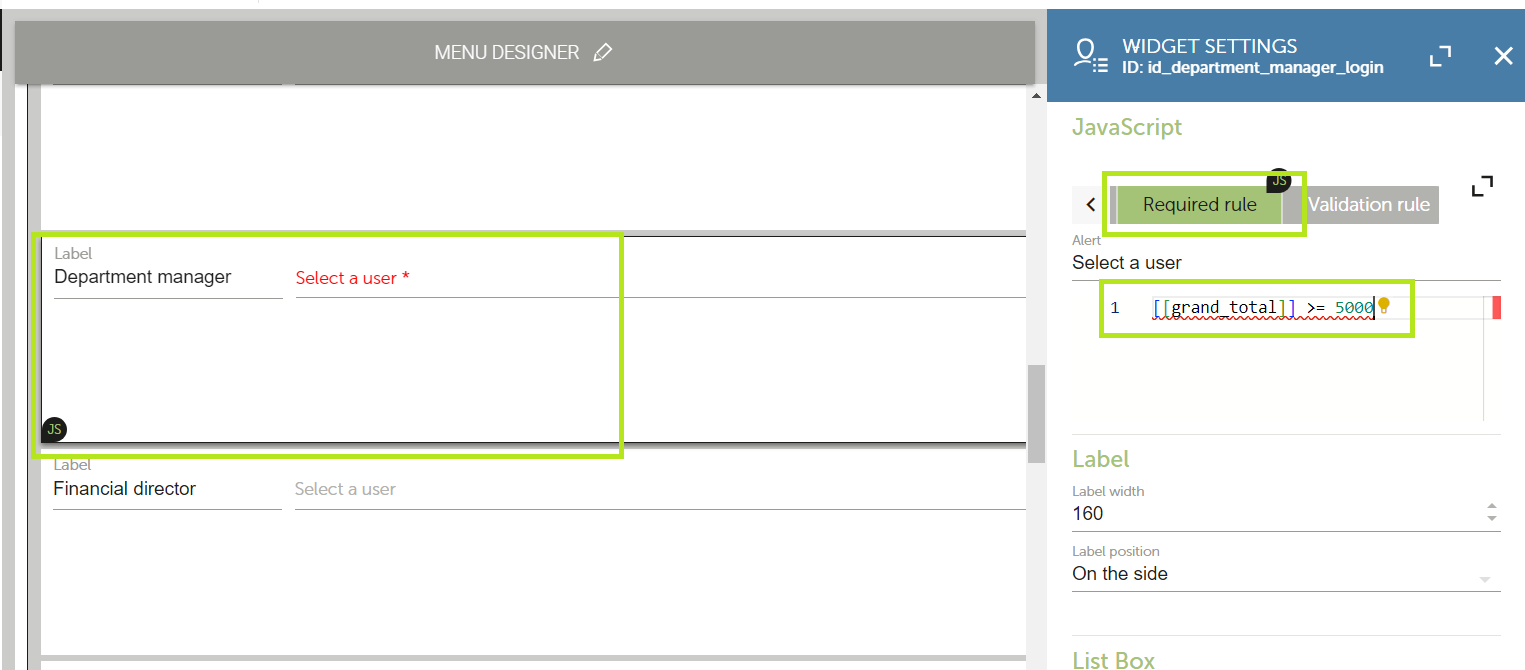
Do the same thing for all the approval steps and save your changes.
How to modify the maximum number of approval steps?
To do that, you have to modify both the web interface and the process. First, select Processes and open the process Budget Approval Management.
Then delete the steps you don’t need with the delete key of your keyboard (fn + delete on a Mac), or select the Delete option of the task.
Below is an example of removing one approval step.
Select Web interfaces and open the form Example - Budget approval. Select the widget(s) you don’t need, Financial director for instance, delete it by clicking on the Delete button and save your changes.

How to change the language of the application?
To change the language, you have to modify all the labels of the two web interfaces and modify the values of the measures. To modify the label of the widgets of the applications and the values of the measure status, please refer to the section How to change the name of the approval steps?. You also have to modify the value of the variable “status” on the two steps Notify the author. Also modify the labels of the web interface Budget approval - Report. Select Processes and open the process Budget Approval Management.
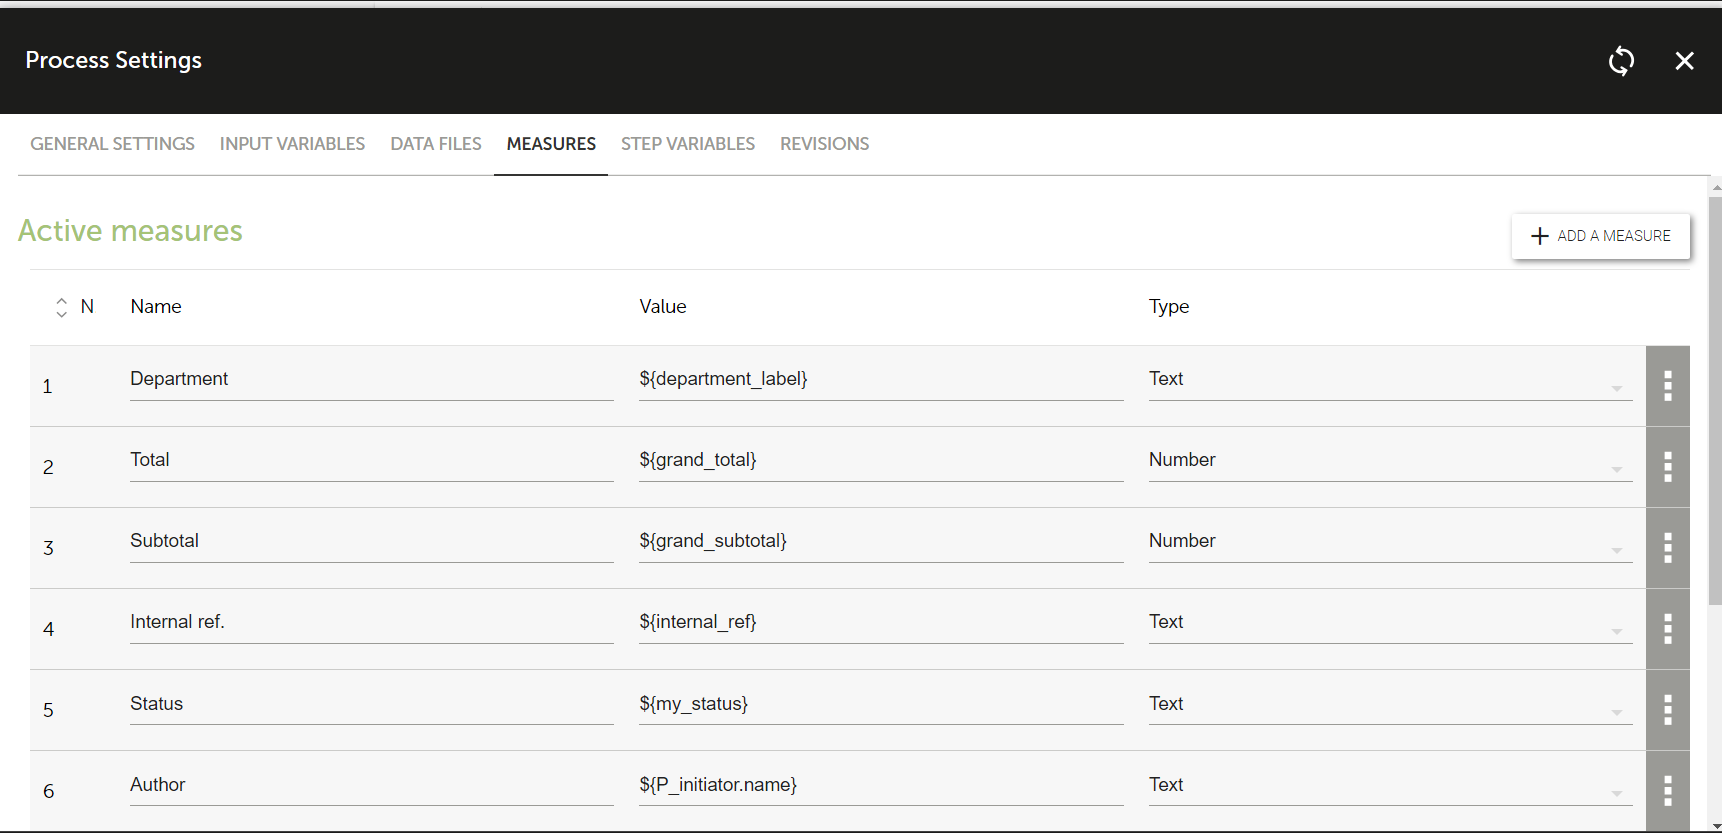
Then click on the Measure button and modify the name of the measures and save the process.
How to modify the look of the application?
Customize the application's look and feel with a CSS file:
-
Upload your CSS file: In the project settings, go to the versioned files section and upload your CSS file. You can find an example of a CSS file that modifies the tab colors of the reports section here.
-
Link the CSS file to a web interface: Locate the specific interface you want to modify (e.g., "Budget Approval - Report") in the web interfaces section.
-
Attach the CSS file: Access the interface's settings and navigate to the CSS tab. Use the "Add existing CSS" option to select and attach your uploaded CSS file.
-
Save and view the changes: Confirm your selection and save the changes made to the web interface. Run the interface to see the updated look and feel implemented by your custom CSS code.
How to put my modifications in production?
Please refer to the chapter Creation of a new version.